Tuesday, March 27, 2018

Switching to color-matching amber fog lights...


The nice part about a great online community is that when a great product needs a little tweak - the vendors LISTEN!  We all tend to love https://fordraptorlights.com/  because they put out great products - the fog pocket lights match PERFECTLY to the OEM body style and looks like it should have come from the factory that way...

The little 10W KC-HiLites at the outer edge can be clear or amber, well the amber lenses from KC-HiLites that come with the setup are a little too yellow - think Subaru WRX fog light color :)

Well, we spoke and FRL listened!  They developed new lenses that are color matched to the OEM amber lights - so much better!

Check out the pics!

Here you can see the new amber lens on the left which is ever so slightly darker when compared to the KC-Hilites on the right.


Next - some of the color probably comes from the lens thickness, the KC lens is on the left, and the new lense is on the right - it's probably double the thickness!


Here I've mounted the new lens on the left pic, and the original is on the right... hard to see in the daylight, but the new lens is brighter and matches the color of the OEM lights!

new amber lens below


original KC lens below


side by side light output


Pretty noticeable difference!
I hope this helps if you're looking for a color match.

  The lenses are only $12!  WELL worth the service and look!


Sunday, March 11, 2018

Flowmaster FlowFX Review 2017 Ford Raptor

One more thing - right?  Well, I was able to get a great deal on this part and so far very happy with it!  The  Flowmaster 717776 Exhaust Muffler is a mid-muffler replacement for the OEM part.  It keeps the OEM resonator and the existing tailpipes - which I'm fine with.  I like the matte finished black tips and just wanted a little more sound from the exhaust, and NO drone!  Love it!

Here's a quick video of the sound!


and a longer video of the review!


Flowmaster FlowFX is their new design where it's not just a muffler that you weld in - it's a slip-fit system that makes things a LOT easier for installation.


Features
Designed as a direct-fit replacement muffler for the 2017-2018 Ford Raptor trucks with the 3.5L Ecoboost engine. This easy to install direct-fit muffler delivers a moderate to aggressive interior and exterior sound level that will appeal to anyone looking for a deep powerful exhaust note. Features include all 3.00 inch mandrel-bent bright stainless steel tubing mated to a specially designed dual 3.00 inch inlet/outlet "straight-through" FlowFX muffler for great sound and maximum performance. Utilizes the factory hangers and connections without any cutting or welding and installs in about 20 minutes. Includes all necessary parts and hardware. Proud to Say Made in the USA.

  • Bright 409s Stainless Steel Construction
  • Moderate to Aggressive Exhaust Tone
  • Quick and Easy Installation
  • Direct-fit System


Tuesday, March 6, 2018

2017 Raptor Part 1 802a Stereo Upgrade - Pioneer TS-A878 center channel

FINALLY getting around to upgrading my speaker(s) - did a quick video on the process for the center dash speaker - yes it's just one. The Sony system isn't terrible in the Raptor, but it needs more help for sure - the range of the OEM speakers is pretty stale... From lots of reviews on the forums, these Pioneer A-series are an inexpensive addition to really make the audio 'sing' 😎

Parts needed for this task:


Next will be the doors!

Tuesday, February 6, 2018

TopCoat F11 on the Raptor - wow, nice shine!

OK - you've probably seen the ads online and on Facebook - TopCoat F11 - never wash your car again!  LOL right?  Wouldn't that be nice!?

Well, I bit the bullet during the holidays to try it out - and I'm pretty impressed to be honest!  They send you a bottle of TopCoat spray, 1 small sealer, and 2 lint free polishing cloths. 


At first, I was like - what is this bottle?  Seriously?  It smells funky to be honest - but then I realized I could apply it on EVERYTHING!  Doesn't matter if it's paint, glass, bumpers, etc.  It puts a great shine on everything!  

First I washed the truck with ONR wash n wax - that itself is amazing.  I used a 5-gallon bucket with ONR, a Grit Guard insert, and about 2 gallons of water with some microfiber cloths...


once you've tried ONR, you'll never go back!

After everything is washed and dried - it's time for the TopCoat...  honestly I wasn't expecting much, reviews say it streaked, etc...  so I started one panel at a time.


As you can see from the results - the truck looks BRAND NEW!  I'm seriously impressed!  It's odd, but I can't wait for rain! :)  LOL

Give it a try, you'll be amazed!


Friday, January 26, 2018

My Forscan favorite tweaks to the 2017 Ford Raptor

From my previous blog about Forscan it's a free tool that lets you monitor, modify the computers in your vehicle.  The 2017 Ford Raptor is able to take advantage of this tool as well!


Please do some research. After doing that - you'll need the following setup to repeat what I've done with my truck:

  1. Windows Laptop with Bluetooth
  2. http://www.forscan.org/ software, and follow the process from my previous blog.
  3. A modern OBDII device, I chose the ScanTool 426101 OBDLink MX Bluetooth - yes it's pricey, but it's seriously one of the best devices as you can leave it installed and it has auto power on/off.


The Forscan tutorial is continually updated, I highly suggest reading through it since it will simplify your understanding for your vehicle and what risks/benefits you'll find.


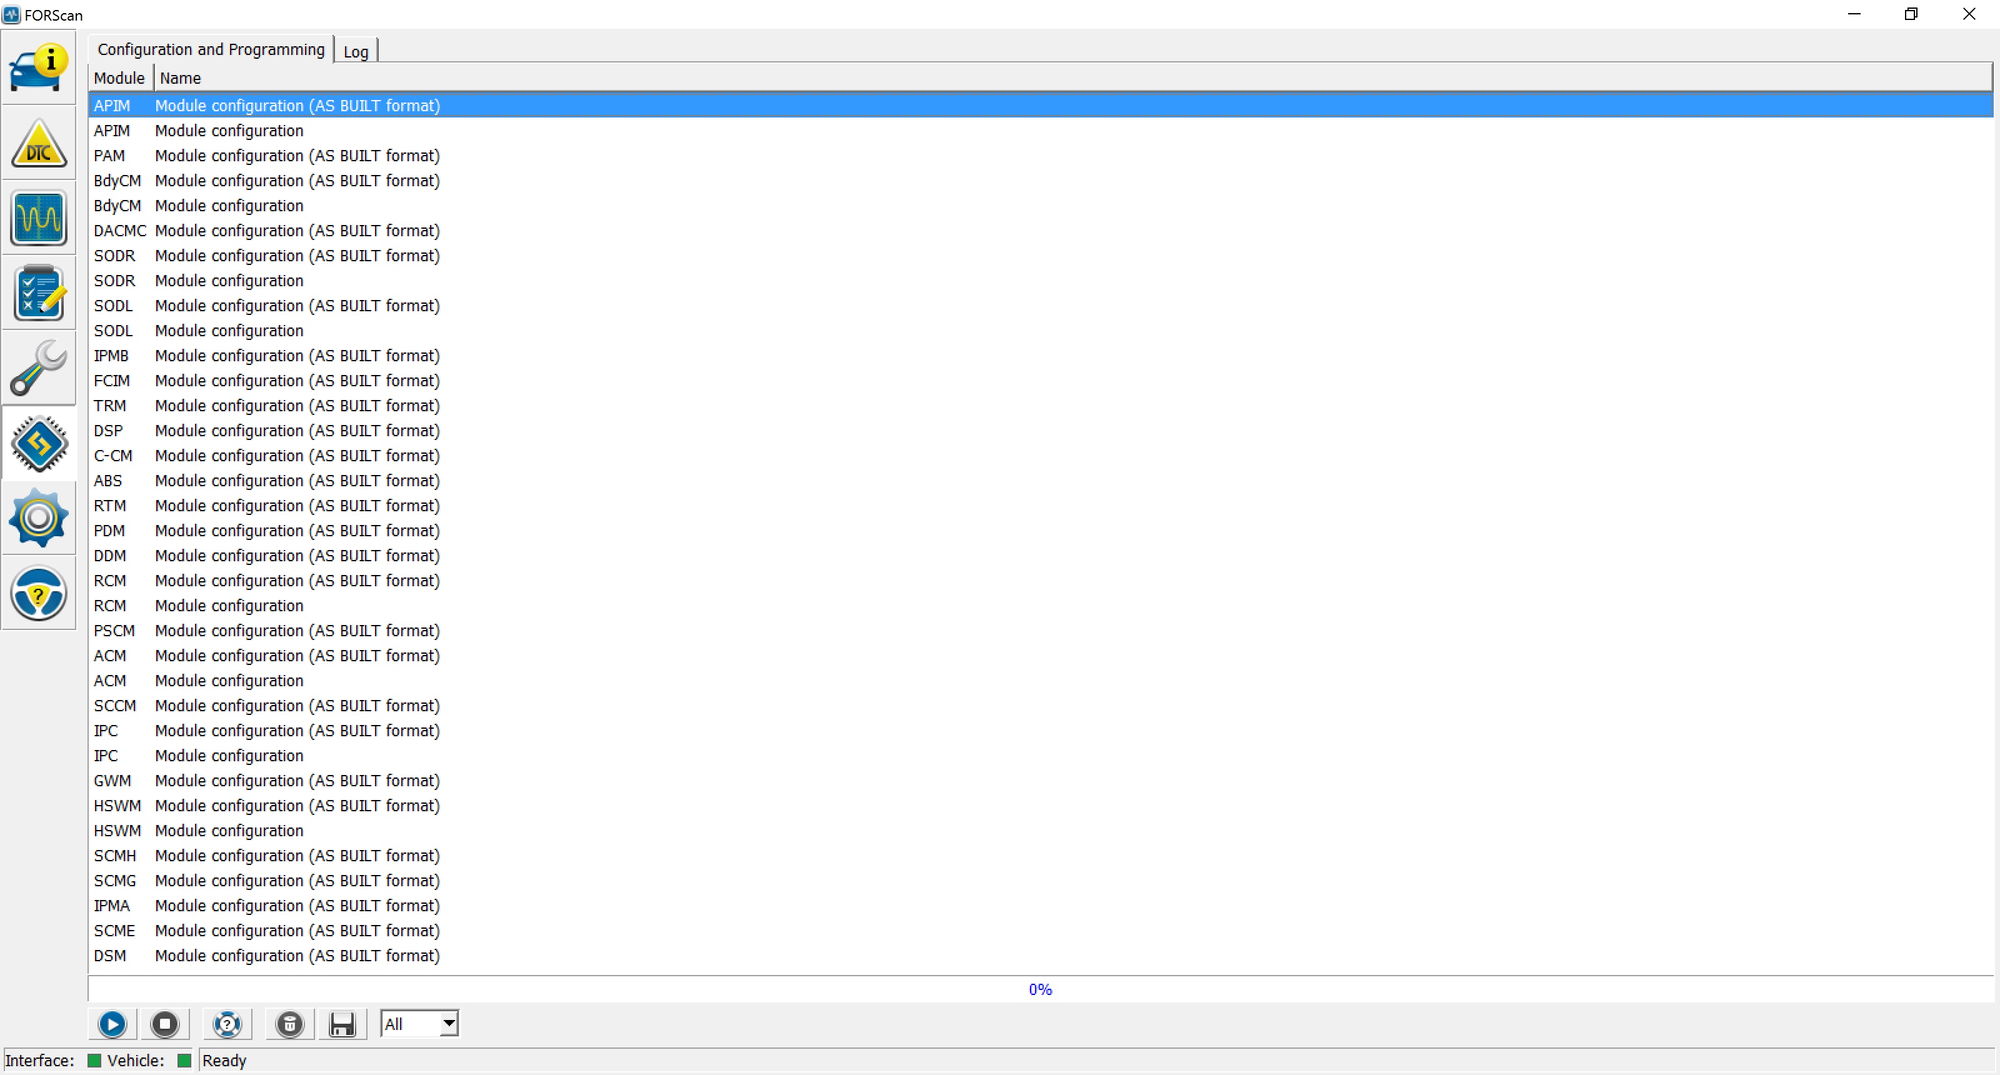
There are tweaks for multiple vehicles, but for the Raptor you'll want to use the F-150 Forscan spreadsheet... https://docs.google.com/spreadsheets/d/1uDSQ1Z5a2Wt8-kjrSiVSlDFGFHnfeuhb3RTMVz95730/edit#gid=815852466 and example is shown below:


The changes I wanted to apply are the following:

Autofold Mirrors
and the result:


Double Horn Honk disable - basically if you leave your cars in the truck and get out and close the door, you don't get that annoying double honk sound!

Engine temp & Transmission temp shows above gauges (8" Clusters only)
this is nice because you can see when things are actually warmed up!


Fake engine noise disable (TBD - I kinda like it!)

Heated & Cooled Seat Icons AND Heated Steering Wheel on home & climate screen
This is my favorite, really fills in the screen and is super usable on cold days!


Hope this has been helpful - post comments and questions if you need help!


Friday, January 12, 2018

SPD Exhaust Adapters for the 3.5L Ecoboost F-150 Ford Raptor

Engines are air-pumps - plainly said, more air in = more air out.  In general, if you can move more air/fuel - you make more power...

This is why SPD Performance created these SPD Exhaust Adapters - see below...


So you wonder - what the heck is this?

If you see below, the SPD adapter is on the left and the OEM adapter is on the right...
These larger adapters will maximize flow, greatly reduce exhaust back-pressure and help to lower Exhaust Gas Temperatures (EGTs). 

The outlet is 2.3125" ID compared to the stock outlet which is 2.0625" ID.
This is a 25% increase in area for the exhaust to leave the turbo...


You'll need a stud puller - well worth the $20 to save your knuckles!


The guys at the garage had all the right tools to install these puppies... thank God!


They seem to be doing the job - the exhaust sounds a little deeper too!


Thursday, January 11, 2018

F-150 Ford Raptor VTA (Vent to Air) MOD - so simple!

OK - gosh I feel like I should be 17 again...  you know, that cool WHOOSH sound that a turbo car makes, well dammit - mine can do it too! LOL

There's a simple VTA (Vent to Air) MOD that takes the hose off the blowoff/bypass valve that vents the excess turbo pressure and you plug the return hose - instant PSSSHHH!

First - buy a really nice billet plug http://www.stage3motorsports.com/S3M-VTAMOD-2013-2014-F150-3-5L-EcoBoost-S3M-VTA-MOD-Plug.html - I got mine used for $20 shipped.

Some guys use this (honestly you can!)


Simply remove the plate under the front driver skid plate, you know - the one you take off to change the oil filter... 6 bolts, super easy.  You reach up and simply untwist the hose connecting to the BOV off the intercooler.  You can see the hose disconnected below.


Next, you take your fancy plug and stick it in the hose you just removed.


Now, just so I can be cool - I ziptied the hose to the BOV so it won't be jangling around by the fans

And here's the sound result!  Amplified of course thanks to the open air element from Whipple :)


Incredibly simple to do, and if you like the PSSSSH!  then do it!  if not, plug it back in!

See ya!

My visit to Whipple Supercharger in Fresno

I setup a fantastic Group Buy for the Whipple Stage 1 Kit online - we hoped to get at least 10 guys in to get the discount, little did I know that 42 people signed up in 2 days!!  If you know Whipple Superchargers then you understand why they're so good!  They've been around for decades and are most popularly know for their twin-screw superchargers.

Well, the 2017 Ford Raptor - is a twin-turbo V6, so why the heck would Whipple mess with a turbo car?  It's a totally different forced induction running from exhaust gases versus compressing incoming ambient air like a supercharger does... well, it's because Whipple has had a masterful relationship with Ford and they work together to build an amazing ECU tune for this truck!

The kit comes with a new Cold Air Intake (CAI), a bigger intercooler (which is critical in keeping temps lower), and of course the masterful computer retune.  I visited the Whipple home site in Fresno, CA and dropped it off for the upgrades.

Naturally the motor needs to cool down after our 3 hour drive, so they worked on it later that afternoon while my son and I trolloped around Fresno (hint: not that much to do!)

The next morning, I was like a kid at Christmas - up early, wanting to run down and check the tree for presents - but alas, I was in a hotel room and ate some oatmeal with bad coffee  LOL

But we decided to go over to the Whipple shop earlier so we could maybe sneak a peak.  Little did we know that Dustin Whipple himself would give us the grand tour!  


haha - even the bushes say WHIPPLE 

Some nice customer toys in the lot
that supercharged GT350 puts down 987HP!!!

can't go wrong with a blacked out GT

More Raptor Fun!

Yes, that's an engine dyno!

Brand new 2018 Mustang GT ready for a supercharger buildup!

A whole building full of CNC machines making custom/small-order parts!

 Taking bit's of metal like this...

and turning it into this!
 

ooh, dive right in!  LOL


Now, onto the dyno!  Here are my old parts...

and the computer for the dyno


The beast on the dyno!


she's a little fat :)
 

re-gapping the spark plugs...
 

pic of the new intake


Here's the fun! 


Overall, the tune was tweaked and dialed in - the truck goes from 450HP/510ft-lbs stock

 to 

530HP 580ft-lbs tuned!!

VERY happy with the results!

The nice part is this is CARB legal with an actual E0 number 

A lot of folks have been concerned about the 'open' box design - but as you can see the gasket presses up to the hood so it's not fully 'open' under there - definitely gives more 'whoosh' sound from the turbos :)


edit: As you know, turbo vehicles can appreciate a good tune - and Whipple did a fantastic job of keeping this setup CARB legal AND giving the punch it needs.  They even update the Transmission Control Module (TCM) regularly so you can get the benefit of all the Ford updates to the new 10-spd transmission coding!  Hope you enjoy!


Tuesday, December 19, 2017

who wants a do it all boom box with a Ford logo?


This is so retro cool - who wants to buy me one?


it's badass!

  • 8-inch woofer, 3-inch tweeter, and 100-watt peak power amplifier pumps up the volume - great for outdoor adventure!
  • IPX4 water-resistant - okay to leave in the rain
  • "All-terrain tire" rubber-treaded body and 75-hour rechargeable battery for uninterrupted fun from a durable speaker
  • Telescoping handle, wheels, and two side carrying handles give you all you need for portability
  • Includes 12V input jacks and cable to keep your speaker working while you're on the go


Wednesday, November 29, 2017

Installation of the Ford Raptor Lights Kit - you can do it!

From a previous post, I jumped on the Black Friday deal at http://fordraptorlights.com and had a custom setup delivered.  https://2017-ford-raptor.blogspot.com/2017/11/gonna-lite-up-nite-with.html

When the kit arrived, I was super excited.

I've never owned a truck, and I've never wired up lights before - but the new Ford Raptor makes it REALLY easy with the AUX switches that are built into the ceiling console.  For some, this is a trivial install - but it's fun to try something NEW!   Here's the process and steps I took to install...

Custom Triple Bezel Kit Full With Wire Harness Brackets 
KC HiLiTES Flex Lights and all hardware × 1
KC HiLiTES FLEX amber covers × 1
BAJA SQUADRON SPORT DRIVING COMBO PAIR
BAJA SQUADRON PRO SPOT PAIR


Unboxed everything, all in great shape!  Seriously good quality in this build - the frames are SOLID and each piece fits together perfectly!

Here's a closer look at one of the frames with the KC HiLites 10W LED and amber cover.

 One of the amber covers installed, and the other shown - they come with a protective layer on the backside to ensure they're not scratched up - very nice!

Both lights with lenses mounted - this will give a wider spread pattern for fog/snow/rain.

2nd slot gets BAJA DESIGNS SQUADRON SPORT DRIVING COMBO PAIR
notice the bottom 2 lenses are fluted to distribute the light path to the sides, and the top are more of a spot (long throw) pattern...


CENTER slot gets the super powerful BAJA DESIGNS SQUADRON PRO SPOT PAIR, these lights are 4300 lumens which is VERY bright and are long throw for distance

I started to lay out the parts to ensure they're in the right locations, the plastic triangle parts clip into the metal brackets and the KC Hi-Lites fit only in the outer most slots, the BD lights fit into the 2 central slots for the brackets.

 Here's a better picture of the brackets with the plastic clipped into the shell...

 Since the lights are different sizes, they have to be mounted at different heights - the kit comes with washer and spacers to allow for this height adjustment - you can see the collection of washers, risers, lock nuts per light...  pretty simple once you figure it out, and it's all documented in the guide!


A closer view of the driver's side setup - the black bolt shows where the light bracket will reside.

I was excited to see how it all went together so I mounted all the lights...

yes, both sides...

Prior to installing the brackets the kit comes with some nice gaskets that fit the Raptor opening perfectly.  Start at the bottom, trust me it's much easier than any other option.

Fits perfectly - as I stated before - this is a GREAT kit!

When you mount the brackets on the Raptor - there's already 1 hole under the bumper cover brace, the bracket goes in FRONT of the brace and you thread THROUGH that hole into the bracket.  The 2nd hole isn't threaded either but you just turn the screw through the plastic till it catches the bracket.  This was probably the toughest part...

 So - here's the driver's side bracket mounted... notice the BD lights are missing... yeah, after a few phone calls with the Ford Raptor Lights team (THEY'RE AWESOME!) they said it's much easier to mount without lights installed - and they're RIGHT!  

Here are both brackets installed with all lights mounted

Driver's side closeup... 

This was something that I was a bit hesitant on... the kit comes with a pre-wired loom with all the same connectors that fit the KC Hi-Lites but the BD lights need a Weather Tech connector - so you have to cut the end and wire in new connectors.  I'm not new to stripping/crimping but it was one of those unexpected things to do... I sat and watched some Netflix and did the 4 new ends LOL


So the wire loom was completed, and the lights were mounted I just needed to wire these puppies up!
I chose to setup the first 3 of the 6 AUX lights


AUX 1: KC HiLiTES Amber Flex Lights
AUX 2: BAJA DESIGNS SQUADRON SPORT DRIVING COMBO PAIR
AUX 3: BAJA DESIGNS SQUADRON PRO SPOT PAIR

The reason I did this instead of just wiring all of them to 1 switch is that I can customize what light is needed.  If i just need the amber fogs, AUX1. If I need more light for dark roads flip AUX2.  For long shot visibility, flip on AUX3.  All 3 on for BAM! Visibility! :)

I first routed the wire loom to each set of lights and then up the passenger side of the engine bay.  Under the hood, by the passenger side rear of the engine bay there will be 6 wires tucked away - these are the AUX upfitter wires.

SwitchCircuitWire Color
Aux 1CBB47AGreen/Blue
Aux 2CBB48AGray/Yellow
Aux 3CBB94Violet/Orange
Aux 4CBB96Brown/Blue
Aux 5CBB98AGray/Orange
Aux 6CBBA0BYellow/Violet
Here are the AUX1-3 wires connected to the wire loom.  I used some heatshrink butt connectors and added more heatshrink tubing over those to ensure everything is watertight.  

And the finished result!!!

Hope you enjoyed reading as much as I enjoyed installing - leave feedback!

Finally installed my subwoofer upgrade

 So many projects, so little time... but I've been wanting to update my subwoofer and amp for as long as I've owned the truck - it&#...