Showing posts with label raptor. Show all posts

Monday, July 16, 2018

ProClip phone Mount 2017 Raptor...

One of my biggest pet-peeves is when people hold their phone while they're driving - especially when it's a big-ass truck - like a Raptor... HELOOOOO it's almost 3 tons - you're gonna kill someone...

There are tons of mounts out there - just get one, I ended up choosing the ProClip model and have had them in 4 of my vehicles over the years...  they are very well engineered, and haven't had any issues with any phone (or GPS) drops over the years...


quick assembly with a few screws - you buy the right holder for your phone, the long mounting bar has 2 tape strips and it hooks into the dash where the defroster vents are located

simply peel the tape, and hook the back of the mount in the slot


now you mount the front with the tape to the driver side vent


now you see it mounted - almost looks stock!


and here's the final result - perfect placement to see and not TOUCH the phone :)


Friday, April 20, 2018

2017 Ford Raptor rear door 6.5" and Dynamat

Recently I replaced the front door speakers and applied dynamat to the doors - HUGE difference!  I got some time to do the rear doors - just as amazing difference.  Now that all the doors are timbre matched the truck sounds EVEN better!  The Dynamat Sound Dampening really reduces extra noises as well...

Here are some quick tips in case you haven't done this before!
Here are the tools I used: (turn off your ad blocker to see!)


Welcome to the rear doors - very much like the front but only 6 x 7mm screws


he tools that were used...


flat screwdriver slot at the bottom front to help you pry off the handle...


simply pull outward, keeping in mind the tab at the rear of the handle


use your tool to pop open the panel under the handle...


now you can remove the 4 7mm screws in the handle area


 and 2 7mm underneath the door

I didnt do this on the fronts, but removing the door handle clip is really easy - just pry down on the tab at the bottom of the clip, it pops right out!

remember to unplug the connectors - I had 2 behind the handle and of course, the wire clip going to the speaker itself...  naked door!!!


You will still use your 7mm socket, remove the 3 screws from the speaker - there are 2 pegs in the speaker mount - don't worry the speaker won't fall out :)

ok - NOW the door is really naked :)


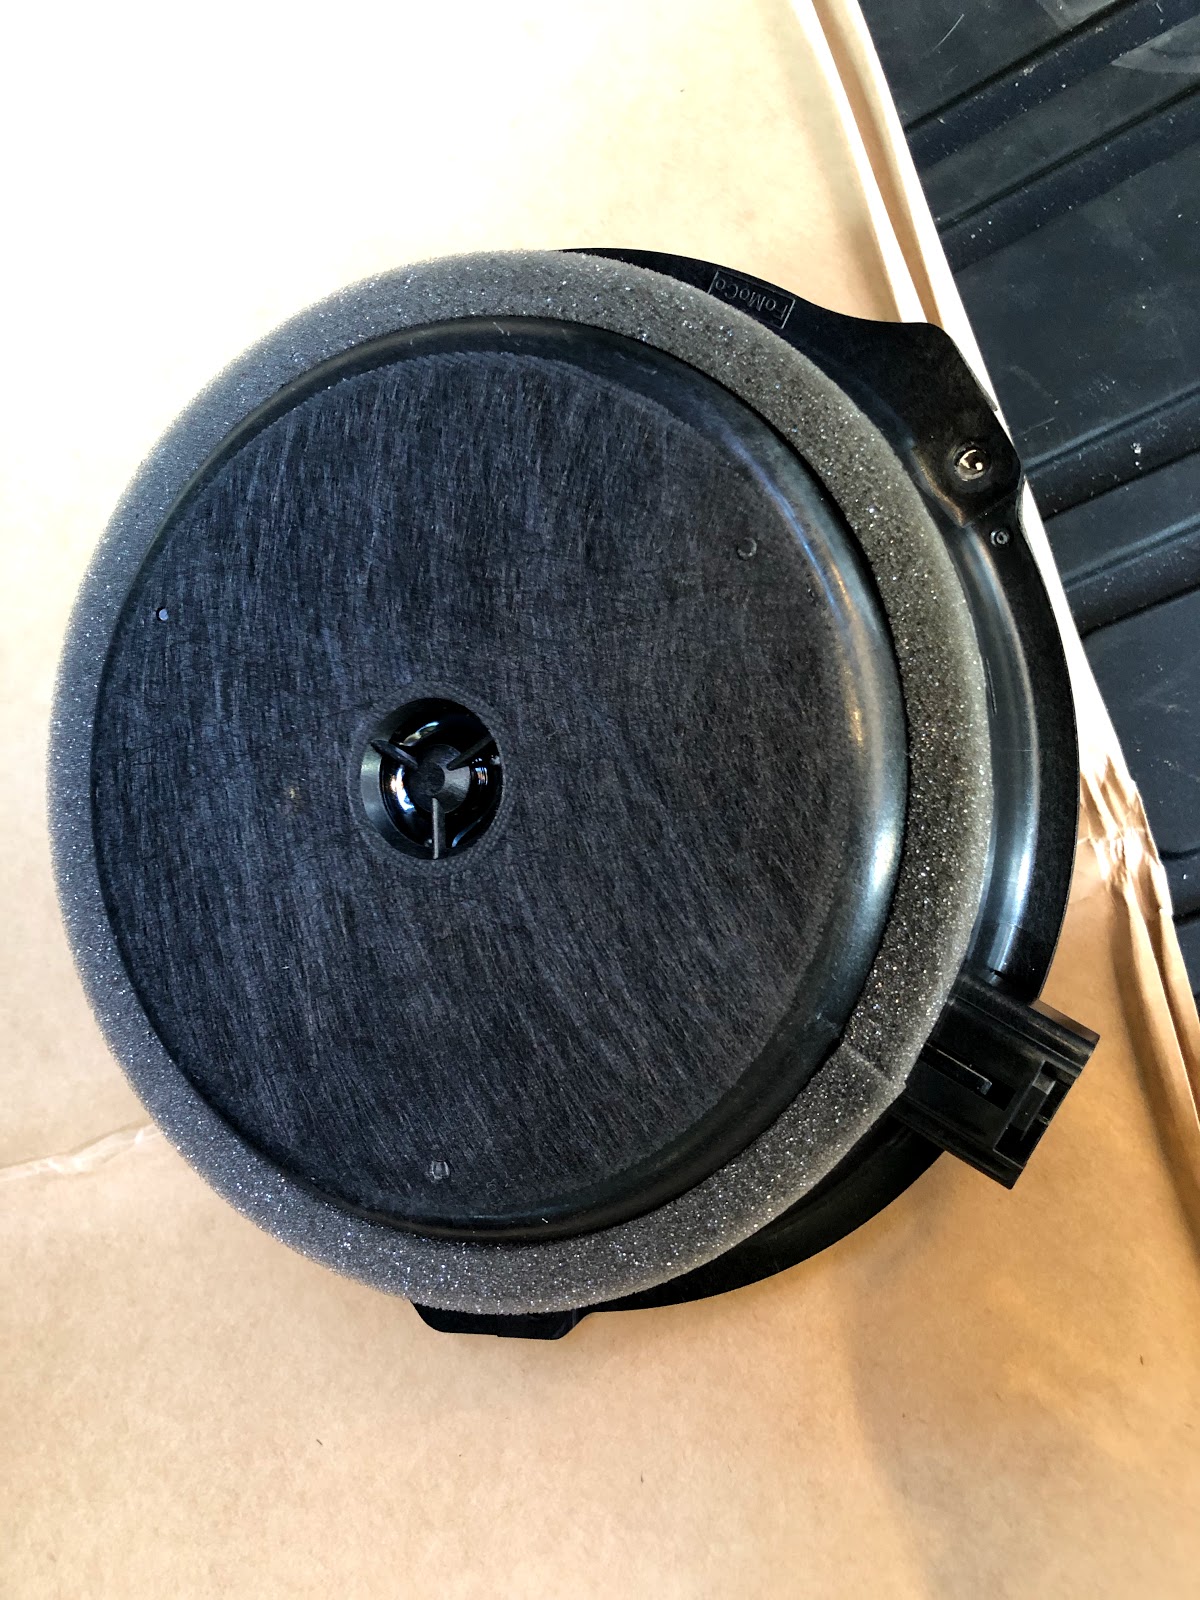
look at the stock unit... yikes!  makes you think WHAT ARE THOSE!!!?!?!?


Slowly peel back the sealant on the vapor barrier, use a utility knife carefully - you'll re-use the stuff.

Oops - forgot this tool!  


Also - this is the Dynamat Extreme pack I used, 9 sheets - and I've used 2 sheets per door!
try to get as much inside the door panel as you can...


Here's how I do the speaker holes - start at the center and cut radially to the edges, I usually do 8 slices (like cutting a pizza)


another pic slicing...


next - put each slice behind the door and tuck it in tightly against the back of the panel - this acts as a good seal for the speaker mount and also adds sound deadening right at the speaker


now you can see the finished speaker opening - be sure you use a utility knife to poke the Dynamat where the speaker mount screws are...


keep working on the door panel with dynamat and rolling it out


here you can see the new speaker next to the OEM one...


note that there is no 'hole' in the mouting bracket for the wiring harness so I chose to pinch the wires in between the dynamat and bracket


The dynamat is soft enough to allow some play in the wiring so I'm not worried they'll wear much...


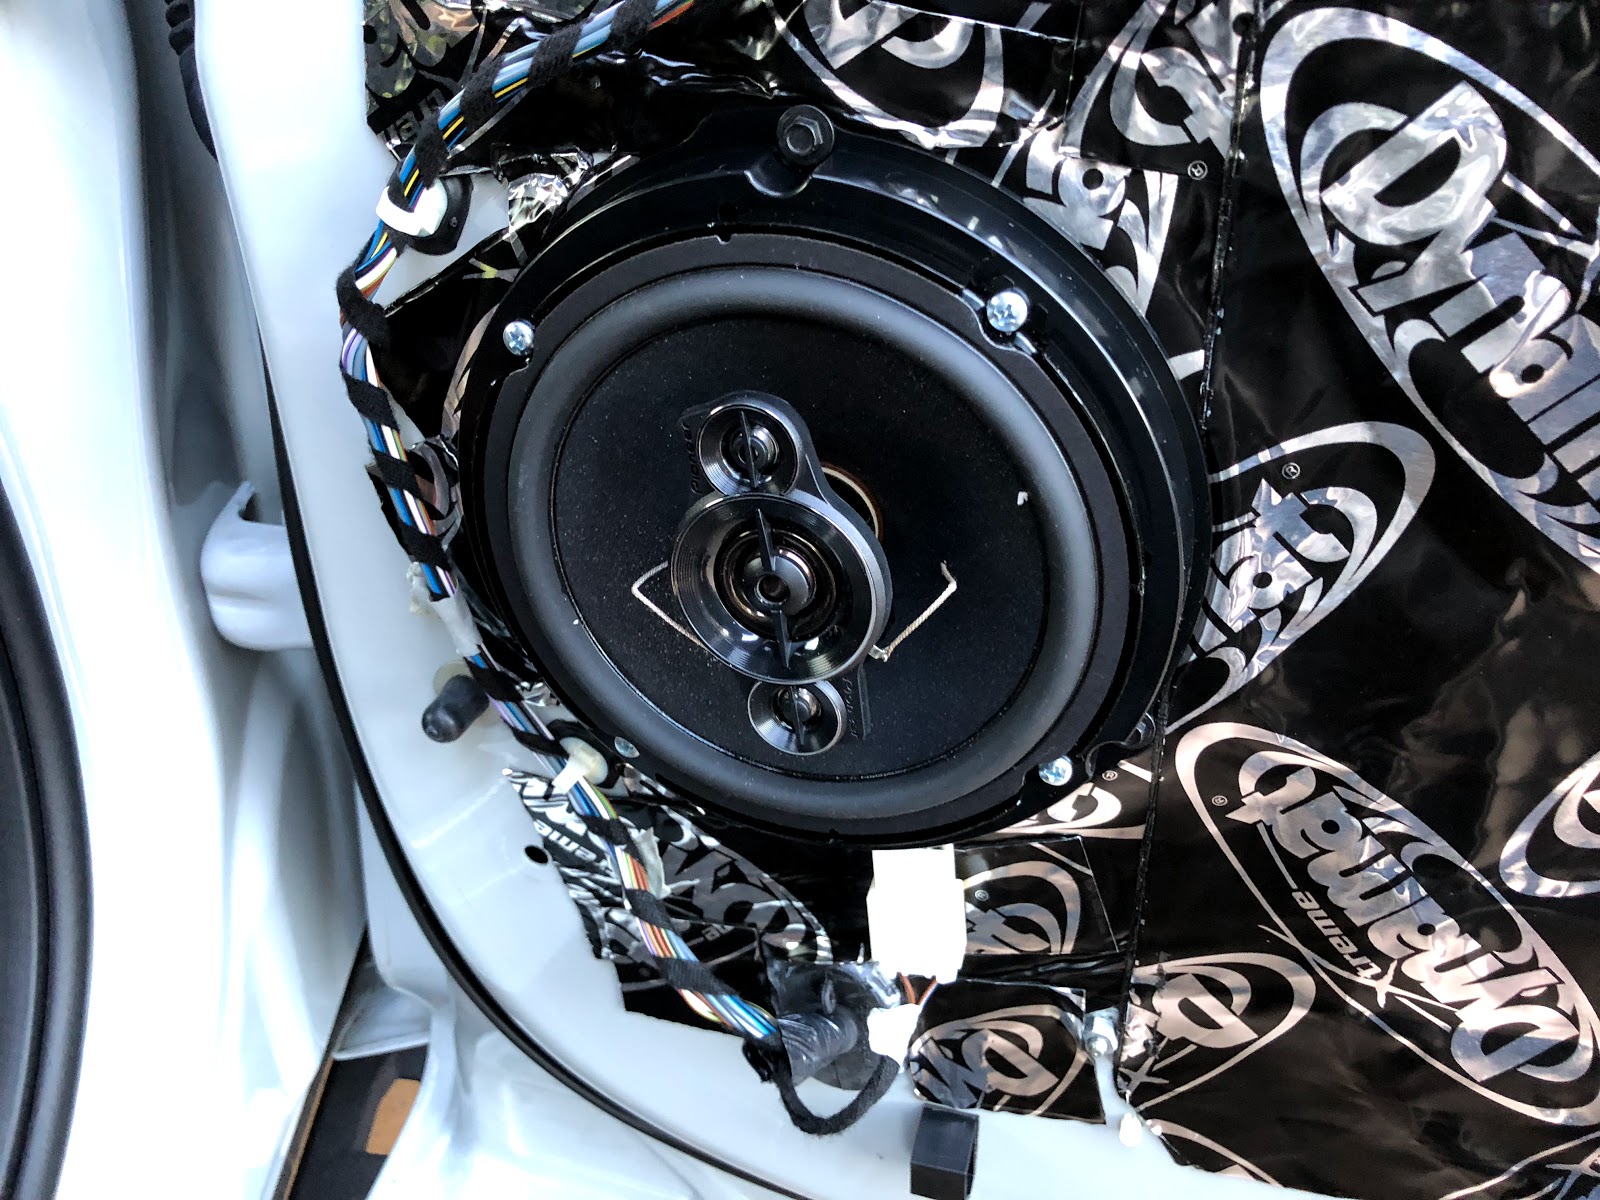
Put it all back together again, and you're done!

The sound of these Pioneer speakers is lightyears better than the stock speakers!
Hope you enjoy!


Tuesday, March 27, 2018

Switching to color-matching amber fog lights...


The nice part about a great online community is that when a great product needs a little tweak - the vendors LISTEN!  We all tend to love https://fordraptorlights.com/  because they put out great products - the fog pocket lights match PERFECTLY to the OEM body style and looks like it should have come from the factory that way...

The little 10W KC-HiLites at the outer edge can be clear or amber, well the amber lenses from KC-HiLites that come with the setup are a little too yellow - think Subaru WRX fog light color :)

Well, we spoke and FRL listened!  They developed new lenses that are color matched to the OEM amber lights - so much better!

Check out the pics!

Here you can see the new amber lens on the left which is ever so slightly darker when compared to the KC-Hilites on the right.


Next - some of the color probably comes from the lens thickness, the KC lens is on the left, and the new lense is on the right - it's probably double the thickness!


Here I've mounted the new lens on the left pic, and the original is on the right... hard to see in the daylight, but the new lens is brighter and matches the color of the OEM lights!

new amber lens below


original KC lens below


side by side light output


Pretty noticeable difference!
I hope this helps if you're looking for a color match.

  The lenses are only $12!  WELL worth the service and look!


Sunday, March 11, 2018

Flowmaster FlowFX Review 2017 Ford Raptor

One more thing - right?  Well, I was able to get a great deal on this part and so far very happy with it!  The  Flowmaster 717776 Exhaust Muffler is a mid-muffler replacement for the OEM part.  It keeps the OEM resonator and the existing tailpipes - which I'm fine with.  I like the matte finished black tips and just wanted a little more sound from the exhaust, and NO drone!  Love it!

Here's a quick video of the sound!


and a longer video of the review!


Flowmaster FlowFX is their new design where it's not just a muffler that you weld in - it's a slip-fit system that makes things a LOT easier for installation.


Features
Designed as a direct-fit replacement muffler for the 2017-2018 Ford Raptor trucks with the 3.5L Ecoboost engine. This easy to install direct-fit muffler delivers a moderate to aggressive interior and exterior sound level that will appeal to anyone looking for a deep powerful exhaust note. Features include all 3.00 inch mandrel-bent bright stainless steel tubing mated to a specially designed dual 3.00 inch inlet/outlet "straight-through" FlowFX muffler for great sound and maximum performance. Utilizes the factory hangers and connections without any cutting or welding and installs in about 20 minutes. Includes all necessary parts and hardware. Proud to Say Made in the USA.

  • Bright 409s Stainless Steel Construction
  • Moderate to Aggressive Exhaust Tone
  • Quick and Easy Installation
  • Direct-fit System


Tuesday, March 6, 2018

2017 Raptor Part 1 802a Stereo Upgrade - Pioneer TS-A878 center channel

FINALLY getting around to upgrading my speaker(s) - did a quick video on the process for the center dash speaker - yes it's just one. The Sony system isn't terrible in the Raptor, but it needs more help for sure - the range of the OEM speakers is pretty stale... From lots of reviews on the forums, these Pioneer A-series are an inexpensive addition to really make the audio 'sing' 😎

Parts needed for this task:


Next will be the doors!

Tuesday, February 6, 2018

TopCoat F11 on the Raptor - wow, nice shine!

OK - you've probably seen the ads online and on Facebook - TopCoat F11 - never wash your car again!  LOL right?  Wouldn't that be nice!?

Well, I bit the bullet during the holidays to try it out - and I'm pretty impressed to be honest!  They send you a bottle of TopCoat spray, 1 small sealer, and 2 lint free polishing cloths. 


At first, I was like - what is this bottle?  Seriously?  It smells funky to be honest - but then I realized I could apply it on EVERYTHING!  Doesn't matter if it's paint, glass, bumpers, etc.  It puts a great shine on everything!  

First I washed the truck with ONR wash n wax - that itself is amazing.  I used a 5-gallon bucket with ONR, a Grit Guard insert, and about 2 gallons of water with some microfiber cloths...


once you've tried ONR, you'll never go back!

After everything is washed and dried - it's time for the TopCoat...  honestly I wasn't expecting much, reviews say it streaked, etc...  so I started one panel at a time.


As you can see from the results - the truck looks BRAND NEW!  I'm seriously impressed!  It's odd, but I can't wait for rain! :)  LOL

Give it a try, you'll be amazed!


Friday, January 26, 2018

My Forscan favorite tweaks to the 2017 Ford Raptor

From my previous blog about Forscan it's a free tool that lets you monitor, modify the computers in your vehicle.  The 2017 Ford Raptor is able to take advantage of this tool as well!


Please do some research. After doing that - you'll need the following setup to repeat what I've done with my truck:

  1. Windows Laptop with Bluetooth
  2. http://www.forscan.org/ software, and follow the process from my previous blog.
  3. A modern OBDII device, I chose the ScanTool 426101 OBDLink MX Bluetooth - yes it's pricey, but it's seriously one of the best devices as you can leave it installed and it has auto power on/off.


The Forscan tutorial is continually updated, I highly suggest reading through it since it will simplify your understanding for your vehicle and what risks/benefits you'll find.


There are tweaks for multiple vehicles, but for the Raptor you'll want to use the F-150 Forscan spreadsheet... https://docs.google.com/spreadsheets/d/1uDSQ1Z5a2Wt8-kjrSiVSlDFGFHnfeuhb3RTMVz95730/edit#gid=815852466 and example is shown below:


The changes I wanted to apply are the following:

Autofold Mirrors
and the result:


Double Horn Honk disable - basically if you leave your cars in the truck and get out and close the door, you don't get that annoying double honk sound!

Engine temp & Transmission temp shows above gauges (8" Clusters only)
this is nice because you can see when things are actually warmed up!


Fake engine noise disable (TBD - I kinda like it!)

Heated & Cooled Seat Icons AND Heated Steering Wheel on home & climate screen
This is my favorite, really fills in the screen and is super usable on cold days!


Hope this has been helpful - post comments and questions if you need help!


Friday, January 12, 2018

SPD Exhaust Adapters for the 3.5L Ecoboost F-150 Ford Raptor

Engines are air-pumps - plainly said, more air in = more air out.  In general, if you can move more air/fuel - you make more power...

This is why SPD Performance created these SPD Exhaust Adapters - see below...


So you wonder - what the heck is this?

If you see below, the SPD adapter is on the left and the OEM adapter is on the right...
These larger adapters will maximize flow, greatly reduce exhaust back-pressure and help to lower Exhaust Gas Temperatures (EGTs). 

The outlet is 2.3125" ID compared to the stock outlet which is 2.0625" ID.
This is a 25% increase in area for the exhaust to leave the turbo...


You'll need a stud puller - well worth the $20 to save your knuckles!


The guys at the garage had all the right tools to install these puppies... thank God!


They seem to be doing the job - the exhaust sounds a little deeper too!


Finally installed my subwoofer upgrade

 So many projects, so little time... but I've been wanting to update my subwoofer and amp for as long as I've owned the truck - it&#...