Showing posts with label 6x9. Show all posts

Friday, April 20, 2018

2017 Ford Raptor rear door 6.5" and Dynamat

Recently I replaced the front door speakers and applied dynamat to the doors - HUGE difference!  I got some time to do the rear doors - just as amazing difference.  Now that all the doors are timbre matched the truck sounds EVEN better!  The Dynamat Sound Dampening really reduces extra noises as well...

Here are some quick tips in case you haven't done this before!
Here are the tools I used: (turn off your ad blocker to see!)


Welcome to the rear doors - very much like the front but only 6 x 7mm screws


he tools that were used...


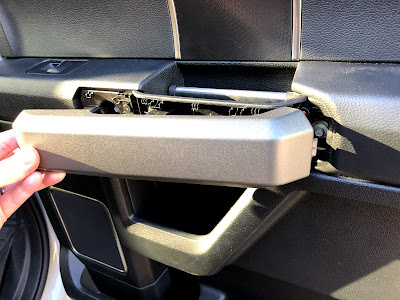
flat screwdriver slot at the bottom front to help you pry off the handle...


simply pull outward, keeping in mind the tab at the rear of the handle


use your tool to pop open the panel under the handle...


now you can remove the 4 7mm screws in the handle area


 and 2 7mm underneath the door

I didnt do this on the fronts, but removing the door handle clip is really easy - just pry down on the tab at the bottom of the clip, it pops right out!

remember to unplug the connectors - I had 2 behind the handle and of course, the wire clip going to the speaker itself...  naked door!!!


You will still use your 7mm socket, remove the 3 screws from the speaker - there are 2 pegs in the speaker mount - don't worry the speaker won't fall out :)

ok - NOW the door is really naked :)


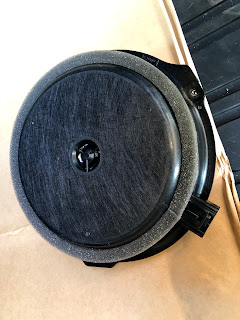
look at the stock unit... yikes!  makes you think WHAT ARE THOSE!!!?!?!?


Slowly peel back the sealant on the vapor barrier, use a utility knife carefully - you'll re-use the stuff.

Oops - forgot this tool!  


Also - this is the Dynamat Extreme pack I used, 9 sheets - and I've used 2 sheets per door!
try to get as much inside the door panel as you can...


Here's how I do the speaker holes - start at the center and cut radially to the edges, I usually do 8 slices (like cutting a pizza)


another pic slicing...


next - put each slice behind the door and tuck it in tightly against the back of the panel - this acts as a good seal for the speaker mount and also adds sound deadening right at the speaker


now you can see the finished speaker opening - be sure you use a utility knife to poke the Dynamat where the speaker mount screws are...


keep working on the door panel with dynamat and rolling it out


here you can see the new speaker next to the OEM one...


note that there is no 'hole' in the mouting bracket for the wiring harness so I chose to pinch the wires in between the dynamat and bracket


The dynamat is soft enough to allow some play in the wiring so I'm not worried they'll wear much...


Put it all back together again, and you're done!

The sound of these Pioneer speakers is lightyears better than the stock speakers!
Hope you enjoy!


Wednesday, April 26, 2017

$600 for a premium sound system - is it possible?

Note: This page works best with your ad-blocker turned off :)

Amazon Associates Disclosure: As an Amazon Associate, I earn from qualifying purchases. Some links below are affiliate links, meaning I may earn a commission at no extra cost to you. Thanks for supporting my projects!

Hey there, audio enthusiasts! The Sony sound system in my Ford Raptor’s 802a package is solid, but it’s missing that crystal-clear highs and deep bass punch I crave for long drives. So, I’m diving into a fun DIY stereo upgrade to give my truck’s audio some serious love. If you’re like me and music makes those road trips epic, this project’s for you! 😎

I’m aiming to keep the total cost around $570, which covers everything, including enough sound deadening material to line the whole truck. My inspiration? This awesome thread on the Ford Raptor Forum that got me pumped to upgrade on a budget.

First up, let’s tackle road noise with some sound deadening. I’m going all-in with the Dynamat Xtreme Bulk Pack (36 sqft) to cover the doors and other key spots. For tighter areas, the Dynamat Xtreme Door Kit (12 sqft) is perfect. Recently, I learned you’ll need two of these kits for full coverage. Want a lighter option? The Dynamat SuperLite Bulk Pack (36 sqft) keeps weight down without sacrificing performance. On a budget? I’ve also got the Noico 80 mil 36 sqft Sound Deadening Mat as a wallet-friendly alternative that still gets the job done.


Now, let’s talk speakers—the heart of any audio setup. After some research, I’m sold on the Pioneer A-Series for their bang-for-buck value. You really can’t go wrong at these prices! For the front doors, I’m installing the Pioneer TS-A6990F 6x9" 5-Way Speakers, paired with Metra 6x9" Speaker Adapter Brackets for a perfect fit in my Raptor.

For the rear doors, I’m going with the Pioneer TS-A1680F 6.5" 4-Way Speakers, also using Metra 6.5" Speaker Adapter Brackets to make installation a breeze. These speakers deliver crisp sound without breaking the bank.

The front pillars need 7/8" tweeters, and I’m eyeing the Pioneer TS-T110 7/8" Tweeters for their clarity. As a backup, the Pioneer TS-T15 3/4" Tweeters are a solid alternative. For the center dash, I’m swapping in the Pioneer TS-A1370F 5.25" Speakers, which adapt well to the 3.5" slot and keep the sound balanced.

To bring the bass, I’m retrofitting a Pioneer TS-WX1210A 12" Powered Subwoofer into the existing subwoofer cabinet. Powering it all is the Pioneer GM-D8704 4-Channel Amplifier, wired up with the InstallGear 4-Gauge Amplifier Wiring Kit for a clean, reliable setup.

Since I’m a fan of Sony’s audio quality, I’m also considering the Sony HT-A3000 3.1ch Dolby Atmos Soundbar to complement the truck’s system. It’s not a direct car audio fit, but its clarity and bass could inspire some home audio tweaks to match the vibe!

This setup is shaping up to transform my Raptor’s audio for under $600! Got any tips or upgrades you’ve tried? Drop a comment, and let’s geek out over car audio!

Added Deaver +3HD leaf springs today!

 The Raptor tends to 'squat' a bit with the travel trailer, so after many days of research I bottomed out (sic) on the Deaver +3HD l...