Monday, October 16, 2017

Adding visibility for lower cost...

Looking to add more visibility (other than the head-turning looks!) - there are some great options to add functionality for relatively low cost. 

I'm opting for the OPT7 model just for a bang-for-the-buck option... what's your take?


Redline OPT7 60" LED Tailgate bar is only $59
 it's weather sealed and comes with 2 year warranty...


Redline OPT7 60" Triple for $89
   

You can go a step up with Putco for $209


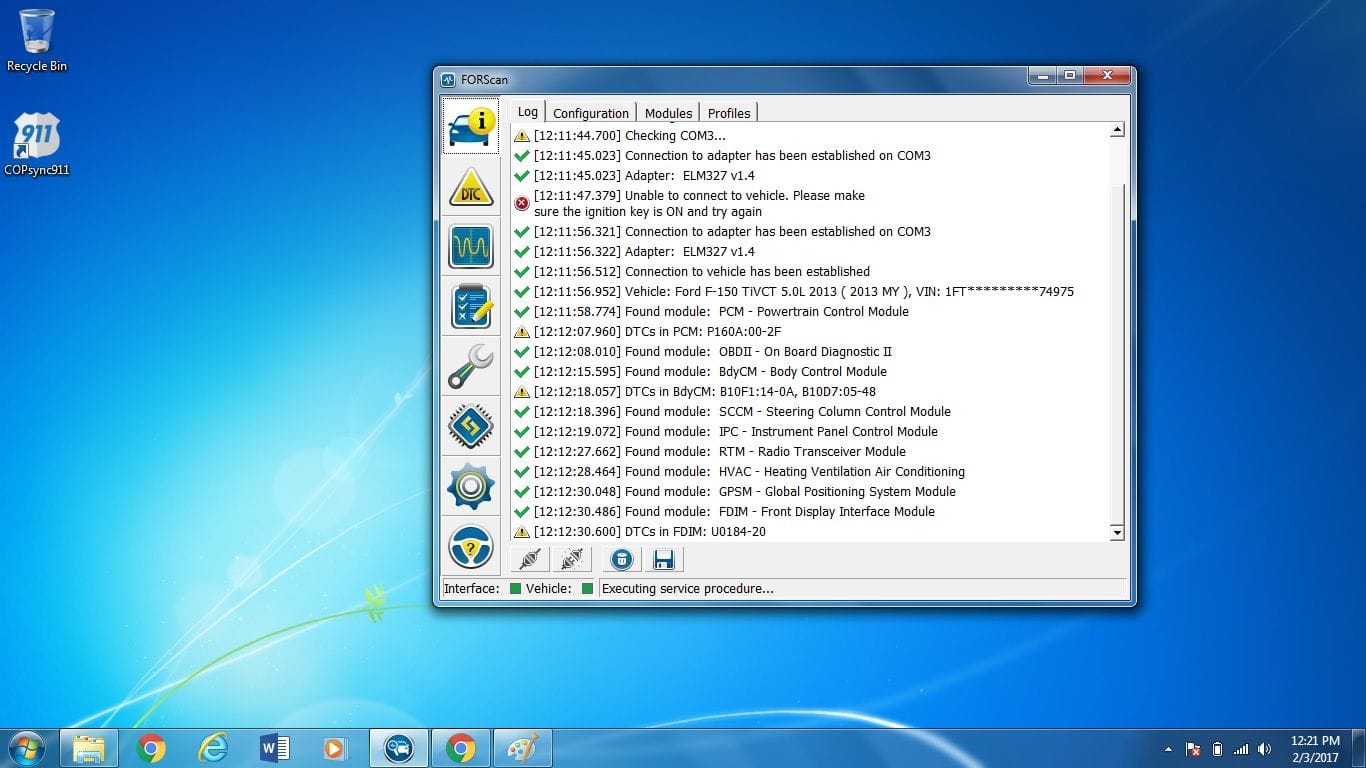
Using FORScan to tweak your ride...

After a few days of researching, I have finally figured out how to download and use Forscan for the Raptor.


Here are links that I used to install/buy/download everything you'll need. 
Do this all at your own risk. It's pretty simple, and always have a backup stock file if you start playing around.

First order your favorite OBDII adapter - these have great reviews! 


  1. Download Forscan from http://forscan.org/download.html
  2. Download the extended license in order to use it. 

  1. You'll need to make an account on the forscan.org forum site. It takes a about 30min or so for an admin to accept you, afterwards, you're good)
  2. Watch this video to learn how to move around. 

Here's a link to all the "As-built" codes discovered so far. 
It's pretty straightforward and can be a little time consuming since when you re-code anything you have to cycle the ignition, but it's worth it.

Tuesday, September 19, 2017

USB upgrade to Sync 3 version 3.0

Well, if you're like me - you love the Ford Sync 3 interface - while it's not perfect, it's pretty darned good!  Carplay is a nice update but if you've updated to IOS 11 - you'll notice some weird things going on - but guess what!? If you don't want to wait for the WiFi update - you can install SYNC 3 Version 3.0 using a USB drive!


There are new features for CarPlay with 
  1. New Nav Icon. 
  2. Fixed keyboard
  3. added symbol $
  4. MUCH faster interface smoother, snappier
  5. Support for new apps

**disclaimer - do this at your own risk! not my fault if it goes belly up!**


Installation instructions: 1. Download. 2. Unzip. 3. Grab a USB Flash Drive, 4GB is fine. 4. Format the drive to either exFAT or FAT32. 5. Put the extracted files inside the flash drive. 6. Turn car on. 7. Plug in car and enjoy!!

***** Note that depending on your USB device it might take up to 10 minutes for the stereo to show "Updating System"... *****

The USB in the car is NOT USB 3 therefore read speed is limited, so if you don't see anything, DO NOT unplug - just wait.... 


There are two versions to update your particular SYNC 3 system

Navigation 
Non-Navigation


found this over at http://www.mustang6g.com/forums/showthread.php?t=90236&fref=gc&dti=935473876561093

Friday, August 18, 2017

BURNOUT TIME!

PEDAL COMMANDER - it's the best money I've spent on the Raptor YET!

You can get a great deal using AUG10 at Freedom Motorsports!


O M G!!!  

If you like burnout videos like this one by Ken Block


you need to get the Pedal Commander!


Seriously it's a 5-minute install and 0 to 10 seconds of smiles from ear-to-ear!  My heart is still pounding from my first test drive... Sport PLUS mode is WAY too much for the street - I'll have no tires left if I keep it in Sport+  LOL

Sunday, May 21, 2017

Patriotic Raptor - thanks Rappy Graphics!

Gotta go full USA on the truck - RappyGraphics has this awesome vinyl for the FORD logo on the Raptor grille.  What do you think?


Looks awesome on the Avalanche color scheme!

Wednesday, April 26, 2017

$600 for a premium sound system - is it possible?

Note: This page works best with your ad-blocker turned off :)

Amazon Associates Disclosure: As an Amazon Associate, I earn from qualifying purchases. Some links below are affiliate links, meaning I may earn a commission at no extra cost to you. Thanks for supporting my projects!

Hey there, audio enthusiasts! The Sony sound system in my Ford Raptor’s 802a package is solid, but it’s missing that crystal-clear highs and deep bass punch I crave for long drives. So, I’m diving into a fun DIY stereo upgrade to give my truck’s audio some serious love. If you’re like me and music makes those road trips epic, this project’s for you! 😎

I’m aiming to keep the total cost around $570, which covers everything, including enough sound deadening material to line the whole truck. My inspiration? This awesome thread on the Ford Raptor Forum that got me pumped to upgrade on a budget.

First up, let’s tackle road noise with some sound deadening. I’m going all-in with the Dynamat Xtreme Bulk Pack (36 sqft) to cover the doors and other key spots. For tighter areas, the Dynamat Xtreme Door Kit (12 sqft) is perfect. Recently, I learned you’ll need two of these kits for full coverage. Want a lighter option? The Dynamat SuperLite Bulk Pack (36 sqft) keeps weight down without sacrificing performance. On a budget? I’ve also got the Noico 80 mil 36 sqft Sound Deadening Mat as a wallet-friendly alternative that still gets the job done.


Now, let’s talk speakers—the heart of any audio setup. After some research, I’m sold on the Pioneer A-Series for their bang-for-buck value. You really can’t go wrong at these prices! For the front doors, I’m installing the Pioneer TS-A6990F 6x9" 5-Way Speakers, paired with Metra 6x9" Speaker Adapter Brackets for a perfect fit in my Raptor.

For the rear doors, I’m going with the Pioneer TS-A1680F 6.5" 4-Way Speakers, also using Metra 6.5" Speaker Adapter Brackets to make installation a breeze. These speakers deliver crisp sound without breaking the bank.

The front pillars need 7/8" tweeters, and I’m eyeing the Pioneer TS-T110 7/8" Tweeters for their clarity. As a backup, the Pioneer TS-T15 3/4" Tweeters are a solid alternative. For the center dash, I’m swapping in the Pioneer TS-A1370F 5.25" Speakers, which adapt well to the 3.5" slot and keep the sound balanced.

To bring the bass, I’m retrofitting a Pioneer TS-WX1210A 12" Powered Subwoofer into the existing subwoofer cabinet. Powering it all is the Pioneer GM-D8704 4-Channel Amplifier, wired up with the InstallGear 4-Gauge Amplifier Wiring Kit for a clean, reliable setup.

Since I’m a fan of Sony’s audio quality, I’m also considering the Sony HT-A3000 3.1ch Dolby Atmos Soundbar to complement the truck’s system. It’s not a direct car audio fit, but its clarity and bass could inspire some home audio tweaks to match the vibe!

This setup is shaping up to transform my Raptor’s audio for under $600! Got any tips or upgrades you’ve tried? Drop a comment, and let’s geek out over car audio!

Added Deaver +3HD leaf springs today!

 The Raptor tends to 'squat' a bit with the travel trailer, so after many days of research I bottomed out (sic) on the Deaver +3HD l...