Wednesday, May 29, 2024

Got a travel trailer - finally!

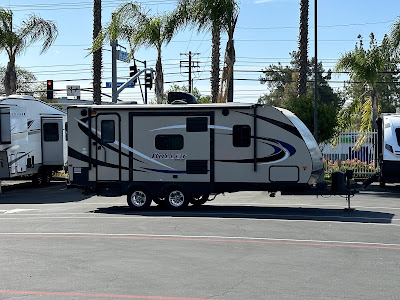
My wife and I have wanted to get a travel trailer ever since we got the Raptor 7 years ago!  We finally bit the bullet(haha) and got a used 2016 Keystone Bullet Ultra-Lite 220RBIWE - we love it!  Obviously, Raptors are not really 'towing' vehicles for daily use, but this trailer is 4600lbs, and GWVR of 6400 lbs and 480lb tongue weight.  For a 25.5' trailer it comes nicely setup with dual slides and a center island.  We got a weight distribution hitch (WDH) with the trailer as well which made a HUGE difference in ride quality while towing.

Here are some pics!  


Monday, September 4, 2023

Finally installed my subwoofer upgrade

 So many projects, so little time... but I've been wanting to update my subwoofer and amp for as long as I've owned the truck - it's been six years!  LOL


Originally I had a Pioneer DVC subwoofer, but realized it was a 2 Ohm model and my amp, Kenwood KAC-M3001 was really built for 4 ohm so I opted to get a different subwoofer - the KICKER CompRT 8"(20cm) Subwoofer, DVC, 4-ohm  This would allow the amp to run at 2 Ohms @ 300W (giving me 50% more power than if I had used the Pioneer setup)


My son printed out a spacer on his 3D printer because the subwoofer was a bit too large at the mounting lip, but the spacer (about 3/4" thick) was perfect.  I also used some stuffing in the box and covered the box with Thermo-Tec which helps to clean up the boominess and give the bass a new dimension.

You can see the spacer, with 2 squishable gaskets (in white) between the box and the speaker

This is it fully mounted, 8 screws holding the spacer, and 8 screws holding the sub to the spacer

I used the existing wire run to use my new wires and a couple of push-tab that are normally used for automotive panels to hold them in place - worked great!  Ziptied them to ensure they don't move around.

Here's the mockup of the amp - I ran an 8 gauge wire from the battery to the amp, and grounded the amp to the bolt at the bottom of the cabin.

here you can see the subwoofer box with new Kicker subwoofer fully mounted with the Thermo-Tec sound deadener

with the seat all the way up, there is PLENTY of room between the speaker and the back of the seat

I re-used the wiring from the OEM amplifier to feed the new AMP - here are the colors on both sides of the connectors


I then snipped the ends, and wire the +/- wires into some RCA connectors

Overall, very happy with the sound.  I turned up the sensitivity (gain) and dialed in the cutoff around 80-85Hz and it sounds amazing!  Much different bass from the OEM setup. Highly recommended!!

Wednesday, November 30, 2022

Rebuilt the shocks at a local shop - Forged Offroad

 I have about 57k miles on the Raptor now, and given my driving style it's suggested to have the stock Fox shocks rebuilt around 50k miles.  If you're a major off-roader, you may have to do this every 10-30k miles depending on the daily beatings.  Fortunately, Forged Offroad is about 11 miles away and they do the majority of shock rebuilds for these trucks and are part of an avid off-road community as well!

For local customers, we can bring to the shop in the morning and it's done by end of day.  In my case, I got there about 8:45am and they called me to pickup around 2:30pm - great time! 


Here's how they look after the rebuild - great team, and great work!


Saturday, July 23, 2022

Cold Start - 2017-2020 Ford Raptor 3.5L EcoBoost Trombone Equal Length Resonator Delete, RDFR20EL

 Here's a cold start video of my Whipple Tuned 2017 Ford Raptor with the SPD Performance 3.5L  EcoBoost Trombone Equal Length Resonator Delete, RDFR20EL


Definitely louder on cold-startup than with the Flowmaster Flow-FX.  The truck sounds like a race car when you floor it, and really screams!  There is some drone from 1,800-2,200 rpm so I'm not happy with that as that is cruising RPM around town.


Thursday, July 21, 2022

SPD Gen3+ Trombone Equal Length Resonator Delete Installed

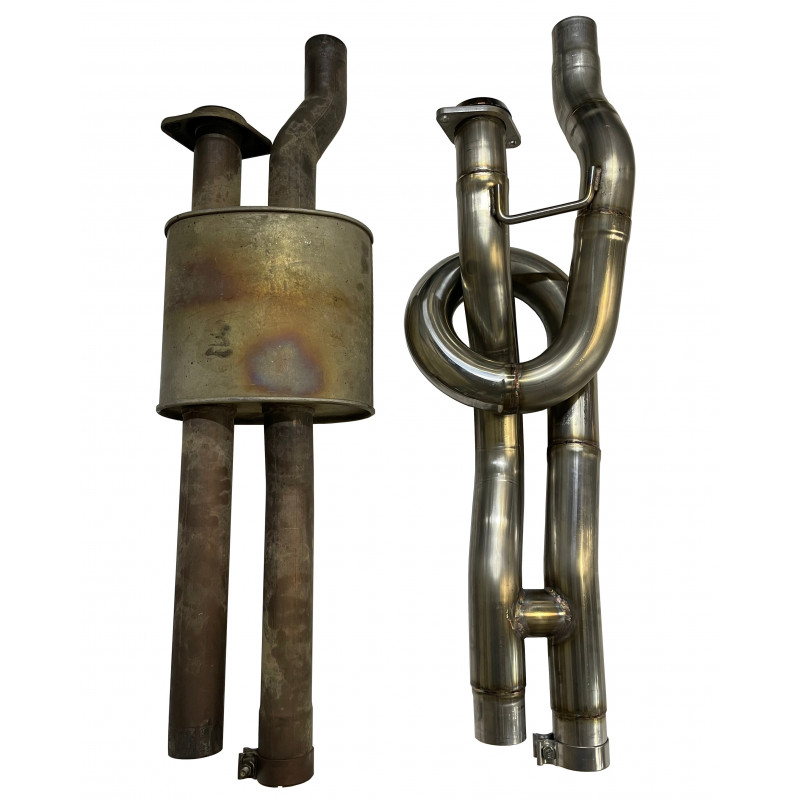
 It's been 4 years since I changed the exhaust with the Flowmaster Flow FX setup and was looking for something a little different.  SPD created this new equal-length resonator delete pipe that mimics the 2020+ Raptor exhaust.  It's pretty funky looking!


When I first reached out in February, I asked SPD about "drone" and they said absolutely no drone... well, it's not entirely true.  


The pipe showed up a few weeks ago, so aboutI had mine installed today - ordered February, showed up about 2 weeks ago... almost 5 months waiting!!!

My initial review (sorry no video yet)
  • The truck idles more deeply, and sounds throatier
  • it's definitely LOUDER for sure, but very cool to hear how this engine 'breathes' - you can't hide any throttle wiggle with this pipe!  Seriously with this mod, it sounds more like you're driving a Ford GT - it's pretty crazy!
  • sadly it drones around 2-2.1K rpms which is really disappointing, which is a lot of driving around town RPMs when in sport mode, and hunting right around 6th gear...
Maybe it's just the difference from the FlowFX which tended to rumble more in the middle of the truck - now all the sound has moved to the rear outlets...

I kept my Flowmaster FlowFX if I want to go back but will give it some time to wear in a bit

Hope to record and post a video soon for a better sound review.


Monday, October 18, 2021

Yuck! Change that cabin filter!

After all the fires this past summer in NorCal, I decided to check the cabin air filters in our cars.  All I can say is O-M-G that's NASTY!  You can get a cheap $12 filter like the BW150 Cabin air filter for Expedition,F150, Replace CF12150,FL3Z-19N619-A (Carbon,1 Pack), or upgrade to a nice HEPA based one like the PureFlow HEPA Cabin Air Filter PC8214HX| Fits 2018-21 Ford Expedition, 2015-22 F-150

Whatever you do - just do it!  Look at our old filter compared to the new one! Seriously disgusting!


To replace your filter takes a few simple steps!

Pull out the ribbed tray just above the glovebox, there's a notch on the far right side that will unclip from the main dash parts.

Now you just need a 7mm socket to remove those 2 screws
 

Slide that upper tray out and to the left - there's some cabling in there but it will stretch enough to get access, then you can reach in and squeeze 2 tabs to remove the cover for the filter

Sit back and ponder how the heck you thought you could breath in your truck with a filter like this!

Drop in your filter of choice, trust me - don't skimp here!

Now you can breathe easy again - congrats on your maintenance! 

Added Deaver +3HD leaf springs today!

 The Raptor tends to 'squat' a bit with the travel trailer, so after many days of research I bottomed out (sic) on the Deaver +3HD l...